On this page
- What you need (and what you can skip)
- Step 1: Prep your feet the day before
- Step 2: Set up the light
- Step 3: Pick the right camera height and lens
- Step 4: Lock focus and exposure
- Step 5: Shoot solo without contortion
- Step 6: Build a set, not a single photo
- Step 7: Edit lightly and consistently
- Step 8: Run a privacy check before anything leaves your phone
- Troubleshooting: why your feet pics look wrong
- Common mistakes to avoid
- FAQs
- What is the best lighting for feet pics?
- What angle is best for feet pics?
- Why do my feet look big in pictures?
- Should I use portrait mode for feet pics?
- How many feet pics should be in a set?
- Can I take feet pics without showing my face?
- Do I need a ring light or a better camera?
- Summary checklist
Quick answer: To take feet pics that sell, shoot beside a window so soft daylight falls across your feet from the side. Keep your phone low, roughly at foot level, and use the 1x or 2x lens rather than 0.5x. Tap to focus, lock exposure and shoot a varied set of 10–20 frames. Then edit lightly and remove location data before you upload.
That's the whole method in a nutshell. The rest of this guide covers the reasons behind each step, because once you know why a photo looks flat, orange or oddly huge, you can fix it yourself. Everything here works on an ordinary phone, and none of it needs your face in the frame.
What you need (and what you can skip)
You need:
- A phone with a working rear camera. The rear camera is usually sharper than the front one, so use it whenever you can.
- A window that gets daylight, or one lamp you can bounce off a wall.
- A plain surface: a pale sheet, a towel, a wooden floor, a rug with no pattern.
- Something to hold the phone: a cheap phone tripod, or a stack of books.
- A way to fire the shutter hands-free: the built-in timer is enough to start.
You can skip a DSLR, a ring light, paid editing apps and a studio background. They help at the margins, but none of them can fix bad light or a bad angle, and those two things decide most of how a photo looks.
Step 1: Prep your feet the day before
Buyers look closely, and close-up photos show every dry patch. This is basic grooming, but the timing matters.
- Trim nails after a shower or bath, when they are softer. The American Academy of Dermatology recommends cutting toenails straight across and leaving cuticles alone, since cutting cuticles raises the risk of infection. Do this the day before so any redness has time to settle.
- Moisturise while your skin is still slightly damp. The AAD's dry skin tips favour creams or ointments over thin lotions for dry skin. Put it on the night before rather than right before the shoot, because a fresh layer can reflect light as shiny patches.
- Avoid tight socks for a few hours beforehand. Sock lines and seam marks show up in close-ups. (This is practical experience, not a medical point.)
- Polish is optional. Chipped polish looks worse than bare nails. If you paint them, do it the day before so the polish is fully dry and smudge-free.
If you have a skin or nail condition, get it looked at first. Your health comes before a photo set.
Step 2: Set up the light
Light has more effect on your photos than any other single factor, and the best light costs nothing.
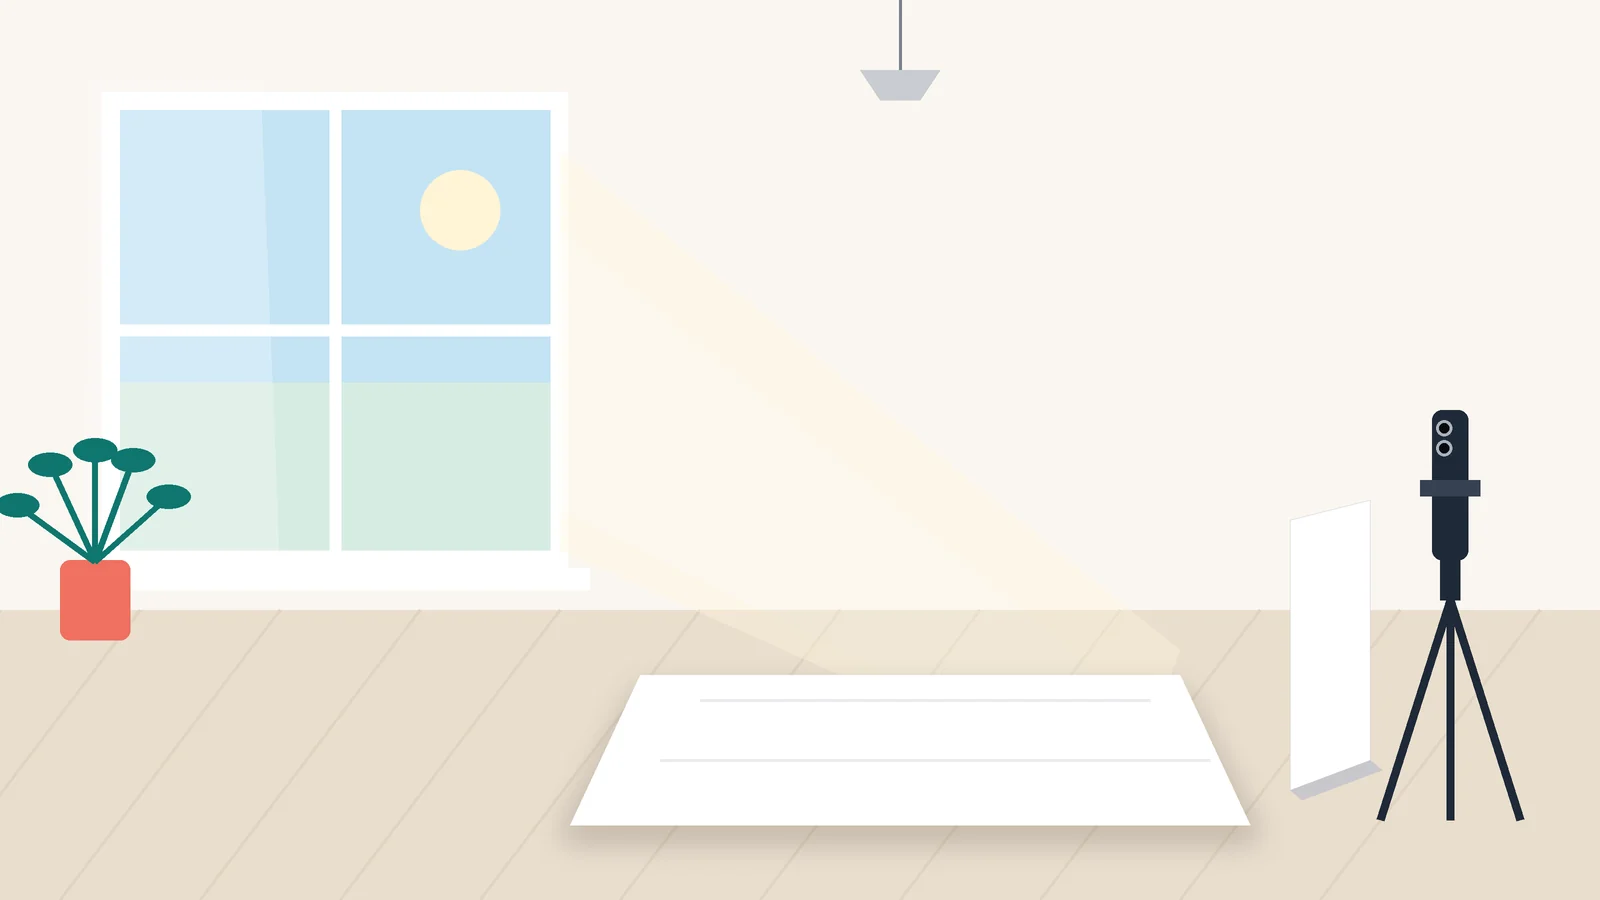
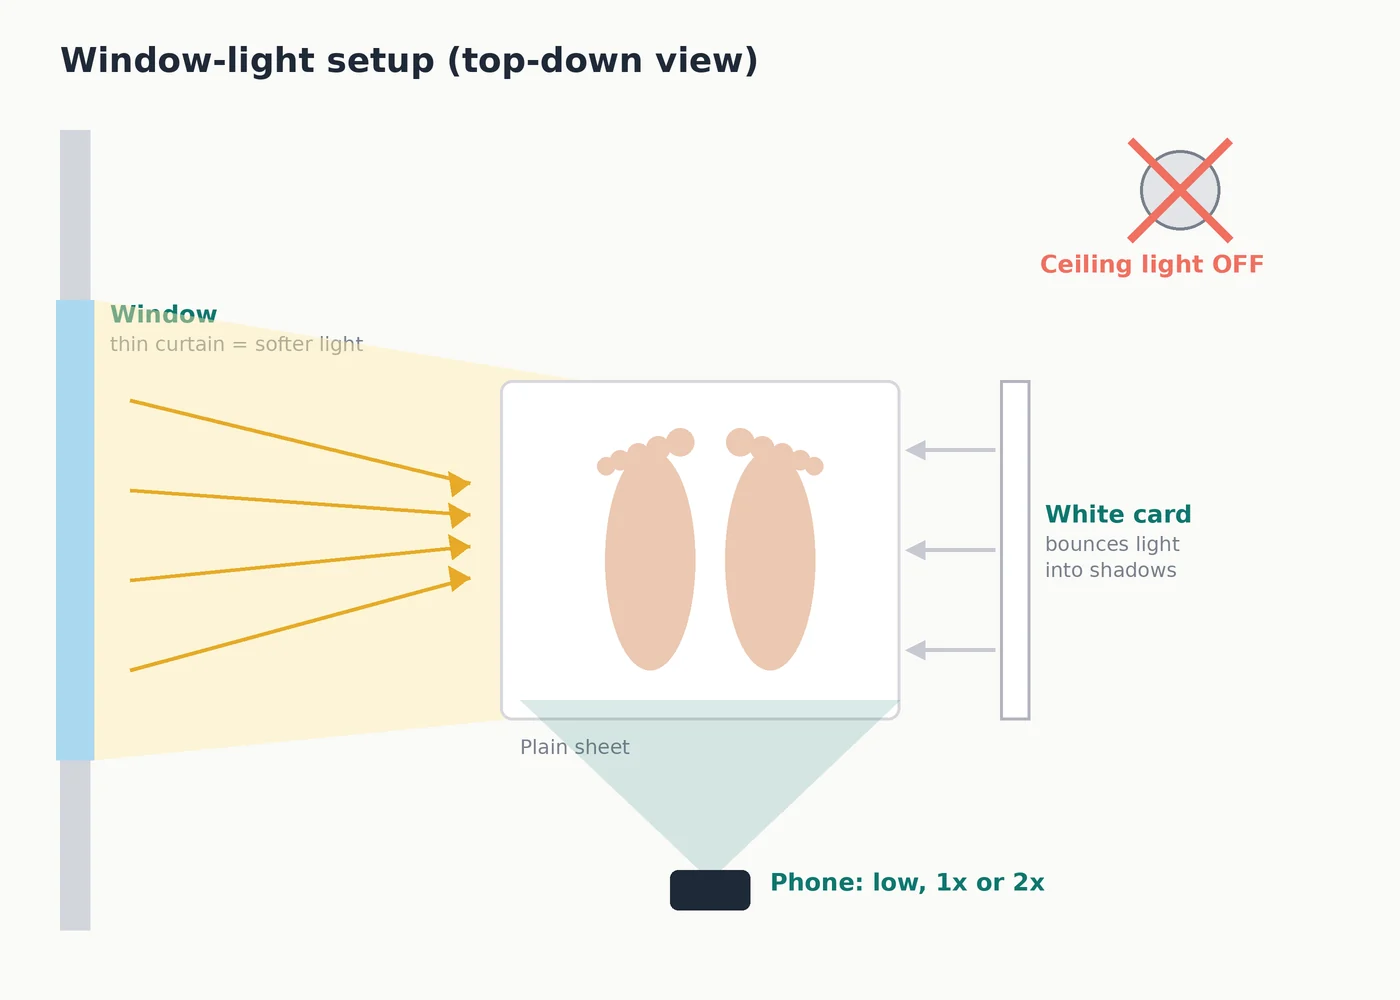
Use side light from a window. Put your feet about an arm's length from a window so the daylight falls across them from one side. Side light creates soft shadows along the arch and between the toes, and those shadows are what make a foot look three-dimensional. When the light comes straight from the front, there are no shadows and the photo looks flat.
Soften direct sun. If the sun shines straight through the glass, the shadows turn hard and the highlights burn out. Hang a thin white curtain or sheet over the window, or wait for a cloudy spell. Overcast daylight is one of the easiest kinds of light to work with.
Fill the dark side. Prop a sheet of white paper, a pizza box lid covered in foil, or a white pillowcase on the side facing away from the window. It bounces some light back into the shadows. The further away you put it, the subtler the effect.
Turn off the ceiling light. Light from directly above lands on the tops of your feet and leaves the soles and arches dark. It also mixes with the daylight (see below).
Don't mix light colours. Daylight is cool and most household bulbs are warm. When both reach your feet at once, the camera can only correct for one, so part of your skin looks blue and part looks orange. Pick one source. If you shoot at night, use a single lamp aimed at a white wall or ceiling so the bounced light arrives soft and even, not as a hard beam.
Leave the flash off. At close range, phone flash flattens texture and creates glare on nails and moisturiser.
Step 3: Pick the right camera height and lens
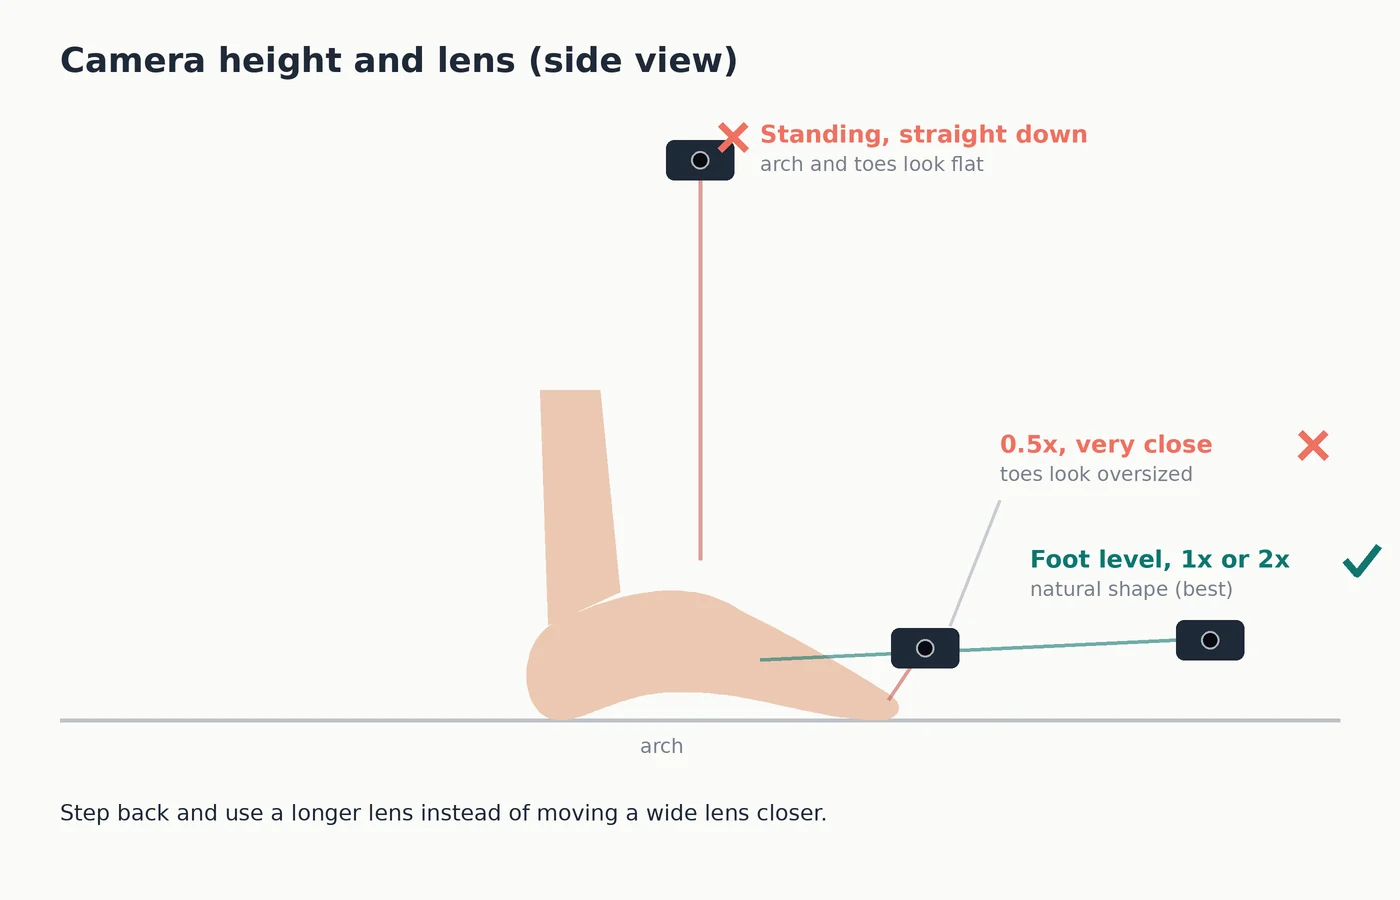
Get the phone down to foot level. The classic standing, looking-down shot is the easiest to take, which is exactly why so many listings look the same. Lower the phone to roughly the height of your feet, or slightly above, and shoot across them. At that height the camera shows the curve of the arch and the length of the toes. Straight-down shots from standing height tend to flatten both.
Watch out for the 0.5x lens. The ultra-wide lens tempts you because it fits everything in the frame when you're close. The problem is perspective distortion: when the lens is very close to a subject, whatever is nearest looks much bigger than whatever is further away. Your toes swell, your heels shrink, and the foot looks stretched or oddly large. The fix is simple:
- Step back.
- Switch to 1x, or 2x/3x if your phone has a telephoto lens.
- Fill the frame by moving the phone, not by going wider.
A slightly longer lens from a bit further away keeps proportions natural. You won't find that tip on most feet-pic guides, and it's one of the quickest improvements you can make.
Portrait mode is optional. It blurs the background, which can hide a messy room. It can also blur parts of your toes, or leave odd edges where the software guesses wrong. Take one normal photo alongside each portrait-mode shot and keep whichever looks better at full size.
Step 4: Lock focus and exposure
When you hold the camera close, your phone can struggle to decide what to focus on, and it may brighten or darken the shot as you move. Take control of both:
- Tap your feet on the screen to set focus there.
- Drag the exposure slider next to the focus box to brighten or darken the image. Pale feet on a pale sheet often come out slightly too bright, so dial it down until you can see detail in the nails and highlights.
- Lock it. On iPhone, touch and hold the focus area until AE/AF Lock appears, and your settings stay put for the next shots. Apple documents this, along with the timer and grid, on its iPhone camera tools page. Most Android camera apps offer tap-to-focus and a brightness slider too, though where the lock sits depends on the manufacturer.
- Turn on the grid to keep the horizon and the edge of your sheet straight. Wonky lines in the background make a photo look careless.
Before you shoot a whole set, take one test photo and zoom in to check it's sharp. Editing can brighten a photo, but it can't rescue one that's out of focus.
Step 5: Shoot solo without contortion
Most sellers shoot alone, and it's awkward when you're both model and photographer. These setups help, roughly in order of cost:
| Setup | How it works | Good for | Trade-off |
|---|---|---|---|
| Books or a shoebox + self-timer | Prop the phone and set a 3- or 10-second timer | Starting at zero cost | Framing takes trial and error |
| Phone tripod | Holds the phone at any height, including foot level | Consistent angles across a set | A small purchase |
| Bluetooth remote or smartwatch shutter | Fires the camera without touching the phone | Poses where you can't reach the screen | Check your watch or remote works with your camera app |
| Record video, then save frames | Film slow movements and pick the best moment | Natural, unposed shapes | Video frames are usually lower quality than photos, so use strong light |
Two tricks that help: turn the phone upside down so the lens sits lower, nearer to foot level, and shoot more than you think you need. When you're working alone, a hit rate of one keeper in five frames is normal.
Step 6: Build a set, not a single photo
A buyer paying for a set wants variety, not 15 nearly identical frames. Plan a short shot list before you start so one session gives you a complete bundle:
| Shot | What to show | Angle |
|---|---|---|
| Overview | Both feet, relaxed, on the plain surface | Foot level, 1x |
| Soles | Both soles towards the camera, toes relaxed | Straight on, slightly above |
| Arch | One foot side-on, toes gently pointed | Side, at foot level |
| Toes | A close crop of the toes, sharp focus on the nails | Close, 2x if you have it |
| Crossed or layered | One foot resting over the other | Three-quarter angle |
| Theme shot | Socks, a sandal, an anklet or a seasonal prop | Whichever angle suits the prop |
Pointing your toes slightly lengthens the foot. Overlapping your feet or angling them apart looks more deliberate than setting them flat side by side. For themes and styles that tend to be popular, see the niches section of our step-by-step guide to selling feet pics. To turn a finished set into a price, use our guide to pricing singles, bundles and customs.
Step 7: Edit lightly and consistently
A few minutes of editing is enough. Your phone's own editor will do, or free apps such as Lightroom (free tier) or Snapseed.
- Crop and straighten first.
- Set the exposure so the photo looks bright but you can still see detail in the nails.
- Pull the highlights down if moisturiser or polish reflects the light.
- Correct the colour so your skin looks the way it does in person, not orange or grey.
- Sharpen only a little, and only if the photo was already in focus.
- Save your settings as a preset and apply it to the whole set, so every photo matches.
Avoid smoothing filters and face or body reshaping tools. Buyers notice heavy retouching, and photos that don't match what you actually look like can lead to complaints later. (That's our editorial view, not a rule on any particular platform.)
Step 8: Run a privacy check before anything leaves your phone
This step keeps your identity separate from your content, so don't skip it.
Strip the location data. Photos can carry hidden details. Apple says plainly that sharing a photo or video includes its associated metadata, such as date, time, location and device. What to do:
- iPhone: open the photo, swipe up (or tap the info button) to see where it was taken, and adjust or remove the location. Apple explains where this lives in see photo and video information. To stop the camera saving your location at all, go to Settings > Privacy & Security > Location Services > Camera. Apple's location settings guide covers how each app's access works.
- Android: turn location off in your camera app's settings before you shoot. Google's help page points out that Google Photos can't remove a location your camera added. The exact camera setting varies by phone maker, so check your camera app rather than relying on Google Photos to clean it up later.
Check what's in the frame. Google's help page also warns that people can guess a location from landmarks in a photo. Before you upload, zoom in on every frame and look for:
- mirrors, windows or a TV screen that reflect you or your room
- letters, parcels or anything with an address or name
- distinctive rugs, tattoos, jewellery or pets that also appear on your personal social media
- the view out of the window
Watermark your previews, not your paid files. A small, semi-transparent watermark on public previews makes stolen images less useful to resellers. Our scam-awareness guide explains how stolen-content resellers and "free sample" requests work. For the account-level side (seller name, separate email, keeping your face out of your profile), see staying anonymous while you sell.
Consent and age: only photograph your own feet, or those of another adult who has clearly agreed to be photographed and to have the images sold. Feet content is for adults 18+ only, on both the selling and buying side.
Troubleshooting: why your feet pics look wrong
| Problem | Likely cause | Fix |
|---|---|---|
| Feet look huge or stretched | 0.5x lens held very close | Step back, switch to 1x or 2x |
| Photo looks flat and lifeless | Light from the front or directly above | Move so window light hits from the side |
| Skin is half orange, half blue | Daylight mixed with a warm bulb | Use one light source only |
| Blurry toes | Focus landed on the background, or the phone moved | Tap to focus, lock AE/AF, use a stand and timer |
| Shiny white patches | Fresh moisturiser or polish catching the light | Moisturise the night before; lower highlights in editing |
| Dark soles | Main light only reaching the tops of the feet | Add a white card below or opposite the window |
| Messy, distracting photo | Busy background | Plain sheet or floor; crop tighter |
Common mistakes to avoid
- Shooting everything from standing height. It's the angle most listings already use.
- Relying on the 0.5x lens to fit everything in.
- Using the ceiling light and the window together.
- Uploading 15 versions of the same pose instead of a varied set.
- Over-editing until skin looks plastic.
- Forgetting the privacy check, so photos go out with location data or a revealing reflection.
FAQs
What is the best lighting for feet pics?
Soft daylight from a window, falling across your feet from the side, is the easiest good light to get. Diffuse direct sun with a thin curtain, turn off the ceiling light, and use a white card to lift the shadows. At night, bounce a single lamp off a wall.
What angle is best for feet pics?
Foot level, or slightly above it, suits most shots because it shows the arch and the length of the toes. Straight-down shots from standing height tend to flatten the foot. For soles, face the camera almost straight on. For arches, shoot side-on.
Why do my feet look big in pictures?
Usually because the ultra-wide (0.5x) lens is very close to your feet. Close-up wide-angle shots exaggerate whatever is nearest to the lens. Step back and use the 1x or 2x lens.
Should I use portrait mode for feet pics?
It's optional. Portrait mode can hide a messy background, but it sometimes blurs toes or leaves odd edges. Take a normal photo as well and compare both at full size.
How many feet pics should be in a set?
Aim for variety rather than a number. Shoot 10–20 frames in a session, then keep the best handful covering different angles (overview, soles, arch, toes, a theme shot). How many photos to include per bundle is a pricing decision, covered in our pricing guide.
Can I take feet pics without showing my face?
Yes. None of the shots in this guide need your face. What matters more is removing location data and checking reflections, mail and other identifying details in the frame.
Do I need a ring light or a better camera?
No. A recent phone in good window light will beat an expensive setup in poor light. A tripod or phone stand is the most useful first purchase, because it makes foot-level angles and consistent sets much easier.
Summary checklist
- Nails trimmed straight across and skin moisturised the night before
- Side window light, diffused; ceiling light off; one light colour only
- Phone low, on 1x or 2x, not 0.5x
- Focus tapped and AE/AF locked; grid on; test shot checked for sharpness
- Tripod or stand plus timer, remote or watch
- A varied set from a planned shot list
- Light, consistent edit using a preset
- Location removed, frames checked for identifying details, previews watermarked